Showing posts with label papercrafting. Show all posts

Thursday, May 5, 2016

Wearable Art: Paper Beads made from Gelli� Prints

Hi everyone� it's Regina on the blog today! 

We all know Gelli� printing is totally addicting! And as a result of our enthusiasm for printing, we have tons of prints begging to be used! Here�s a fun way to make your finished Gelli� monoprints into wearable art! Paper beads!


Paper beads are fun and easy to make. They are a great way to use up some finished prints and a perfect project for using those little leftover pieces of prints you have been saving!


First, decide what type of bead you might like to make! They are all sorts of designs that already exist or you could even create your very own! These are some that I have used. The beads in this picture are an inch wide and five inches long. The smaller ones are pieces that were cut off the longer ones.


Then, cut out a ton of the paper beads in the shape you desire.


Next, gather your Glossy Mod Podge, an old paint brush or sponge, and a paperclip. Unfold the paperclip until it is in the shape of a long �L.�


Create a very small fold on one end of your short sides to help you start rolling the paper bead.


Apply a generous amount of Mod Podge to the back side of your paper for the bead. Begin rolling your paper bead around the paper clip.
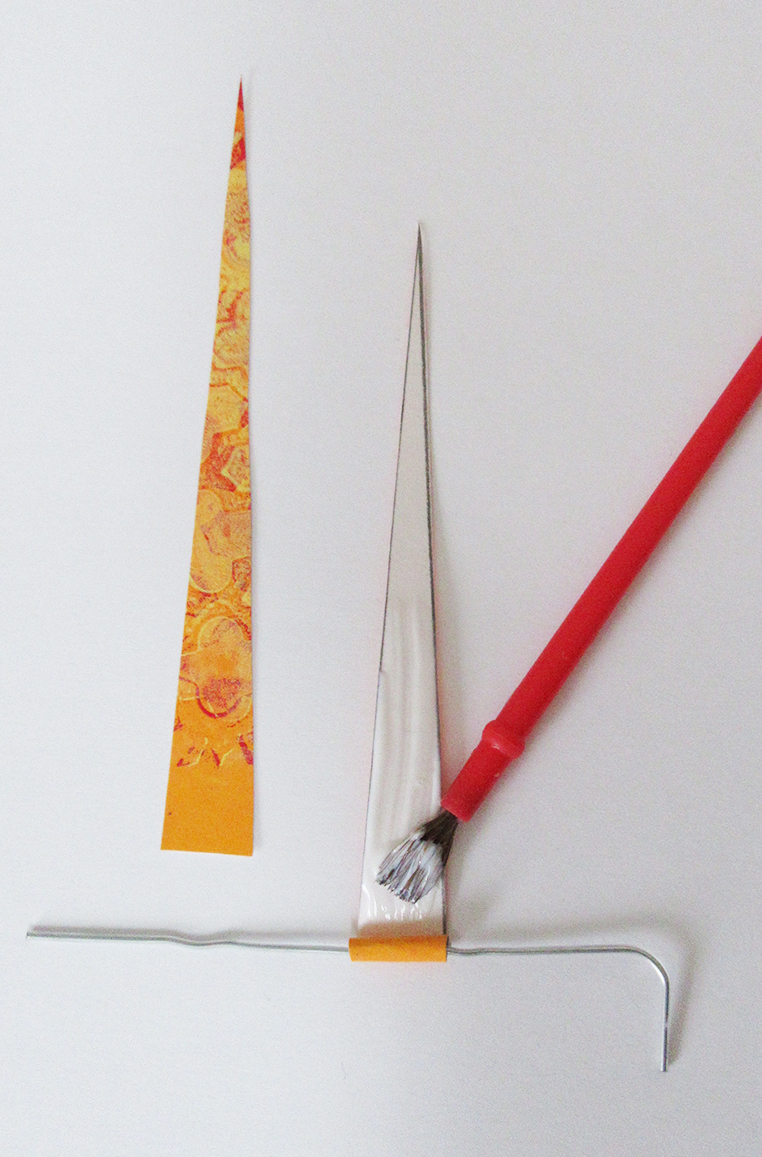


You may need to apply more Mod Podge before finishing rolling the bead since it dries rather quickly. Roll all the way until the tip of your paper is wrapped around the bead or if you prefer you can trim the tip of the paper off.


Paint the Glossy Mod Podge all around the outside of your bead to create the glossy finished look! Allow plenty of time to for your beads to dry. As an added bonus, the beads can stay wrapped around the paperclip while drying!


Tip: While you are waiting for them to dry, you can lay the paperclips across the lid of your Mod Podge or a little paper cup, so they aren�t touching the table!


Once your beads are all finished and dry you can then create beautiful wearable art with them! These are some pieces of jewelry I have made using my Gelli Arts� paper beads. You can further embellish your finished beads with markers, acrylic paint, or Tulip Dimensional paint, like I did on the yellow necklace and earrings! I love how it adds my personal touch!

Necklaces:


Bracelet:


Earrings:


The list of possibilities is endless! If you give it a try, we�d love to see your results!

Here are the materials used to create the paper beads:

            • Finished Gelli� Prints
            • Ruler
            • Pencil
            • Scissors
            • Glossy Mod Podge
            • Paint brush or Sponge brush
            • Paper clips
            • Markers for embellishment
Please�share your prints with us on our Facebook page, or on Instagram using the hashtag #gelliprint #gelliarts and #gelliplate. Tag us with @gelliarts on Instagram and Twitter too! We love to see what you're creating!!

Remember, we now have Gelli partners all over the world, so it's easier than ever to find a Gelli retailer near you!

Have Fun & Happy Printing!

Read More

Thursday, April 7, 2016

NEW Gelli� Student Kit & the Perfect Project � Dahlia Flower Wreath!

Introducing the NEW GelliArts� Student Printing Plate Kit � Kids will love using it � Moms (and Dads) will love the results!! 
    You can find additional fun papercrafting projects on our new GelliArts� page dedicated to Gelli� print projects for kids � Check it out!

    Watch our new GelliArts� Student Printing Plate Kit in action and then try out the perfect Spring project below: A Dahlia Flower Wreath with Gelli� Prints!


    Dahlia Flower Wreath with Gelli� Prints
    Regina again! Back with another fun project for your finished Gelli� prints: a dahlia flower wreath. Spring is finally here! Doesn�t that just conjure up images of gorgeous flowers swaying in the warm breeze? Here�s your chance to enhance that Spring beauty by creating this wreath from your Gelli� prints! This project is super easy to create and if you have any little helping hands around, let them participate in this activity to help it go a little quicker!


    Go ahead and grab nine 8.5� x 11� finished prints. I chose to use similar color prints. My pink, red, orange, and blue prints created the overall color scheme that I was looking to achieve.


    Now, cut the nine prints in fourths. Here is where my paper cutter was a nice bonus because it made this step go really quick, but if you don�t have one of those, then just measure and cut using a ruler and scissors. The measurement of each section should now be 4.25� x 5.5� and there should be thirty-six rectangular prints.


    I chose to add a little bit more pizazz to my wreath by trimming all of the edges of my prints with my Nicole Quality Value Wavy Cut scissors. I completed this step after cutting my prints in fourths. This step is optional and you can use any type of decorative scissors.


    Put your prints aside, we will come back to them! Now, grab your recycled cardboard and cut out a 6.5� circle. You can use a pencil compass or something circular to trace in order to get that circle just right!


    Once you have your cardboard and your prints all ready, you can begin creating your wreath. First, decide what order, if any, you would like your prints to be in and arrange them that way so you don�t forget. You will be creating three layers: the largest layer will require sixteen 4.25� x 5.5� prints, the middle layer will require twelve 4.25� x 5.5� prints, and the top layer will require eight 4.25� x 5.5� prints.


    Roll your 4.25� x 5.5� print into a cone shape and put a thin line of hot glue along the inside edge of your print as you are closing it up. Rolling the print may take a couple of practice rounds before getting it right and adding the glue. Continue to do this with all sixteen prints for your largest layer. They may start to look like ice cream cones!


    Having the pointed parts of your cone meet in the center, use a dab of hot glue to arrange your prints onto the precut cardboard circle.


    Create the cone shape with all twelve prints for the second layer and attach them on top of the largest layer using hot glue. You may need to trim these prints in order for them to fit. I grouped these prints by three making it easier to create a pattern as I placed them onto the first layer.


    Complete the dahlia flower wreath by rolling your last eight prints into cone shapes and then laying them into the center section in a crisscross �X� pattern. You should definitely have to trim these prints in order for them to fit because they should all meet in the middle. I cut off a �V� shape so that these eight cones would still have a nice point at the center.


    I then added a large decorative bead to the center of the wreath, but you could add anything you�d like in the center to give your wreath that finished look!


    You could use this project as a wreath on your door or as a wall decoration! If you give it a try, we�d love to see your results!


    Here are the materials used to create this project:

              • Recycled cardboard
              • Nine finished Gelli� prints
              • Paper cutter or Scissors and ruler
              • Decorative edge scissors
              • Hot glue gun
              • Decoration for center

    Have fun and happy printing!

    Read More

    Thursday, March 10, 2016

    Modular Origami with Gelli� Prints!

    Regina here! Back with another fun project for your finished Gelli� prints: Modular Origami! 

    I am super sick of this cold weather and ready for Spring to be sprung! I have been thinking about the warm breeze and flowers in bloom, so here are some gorgeous origami flowers that are easy to make and will help you get over these last few weeks of Winter!


    Using a thinner paper like a Japanese rice paper or regular copy paper, I created some Gelli� monoprints using bright colors and fun stencils! You can use the 5x5 Student Printing Plate to make square prints for origami � or create prints with any other size Gelli� plate and cut your prints into perfect squares! For the flowers, you only need to print on one side of the paper.


    To create one flower, you will need an even number of prints, with a minimum of six square prints.


    Once all of your prints are together, you can begin creating your flower one petal at a time. I used a bone folder by RecollectionsTM while making this project in order to get a sharp crease, but you could just use the back of your nail to get a similar effect.

    Step 1: Fold your square in half corner to corner diagonally, with your print on the outside of the fold. Make sure to crease well.


    Step 2: With the resulting triangle placed with the longest side on the bottom, bring the right hand corner up to meet the top point of the triangle and crease.


    Step 3: Repeat on the left side side and crease. You should now have a diamond shape.


    Step 4: With the diamond shape in front of you, take the right hand side triangle�s longest edge and fold to the right, aligning its edge with the edge of the diamond. It should meet perfectly at the bottom edge of the diamond. Do not worry about the top edge just yet.


    Step 5: Repeat on the left side and crease.


    Step 6: Open up the right side flap that you just created and fold it down so you have a kite shape. Crease well.


    Step 7: Repeat on the left side and crease.


    Step 8: Turn over the paper and notice the white triangles on the right and left sides. These are the back of your monoprint, which is perfectly okay to leave unprinted as you will barely see it in the finished product. Fold each white triangle back to be even with the edge of the print.


    Step 9: Turn the paper over so now the two triangles you just folded are visible.


    Step 10: Fold the white triangle shape in on itself on the center of the �kite� line so that you recreate your diamond shape and crease.


    Step 11: Bring the edges of the diamond together while adding a glue dot or your favorite dry adhesive for security. Do not crease.


    Viola! You have one petal finished! Repeat steps 1-11 for the rest of your monoprints.


    Attach all of the petals together and your flower is complete!


    If you�re feeling really adventurous, you could make multiple flowers and attach them all together for a flower ball!


    In full disclosure: I did not design this modular origami flower. I was taught how to create it by my art teacher when I was in school. I have since used this project in many ways, such as a project for my own art club, a decoration for a wedding shower, and part of a beautiful retirement gift! If you give it a try, we�d love to see your results!

    Here are the materials used to create this project:
    Please�share your prints with us on our Facebook page, or on Instagram using the hashtag #gelliprint #gelliarts or #gelliplate. Tag us with @gelliarts on Instagram and Twitter too! We love to see what you're creating!!

    Remember, we now have Gelli partners all over the world, so it's easier than ever to find a Gelli retailer near you!


    Have fun and happy printing! 
    Read More