Showing posts with label DIY gifts. Show all posts

Thursday, May 5, 2016

Wearable Art: Paper Beads made from Gelli� Prints

Hi everyone� it's Regina on the blog today! 

We all know Gelli printing is totally addicting! And as a result of our enthusiasm for printing, we have tons of prints begging to be used! Here�s a fun way to make your finished Gelli monoprints into wearable art! Paper beads!


Paper beads are fun and easy to make. They are a great way to use up some finished prints and a perfect project for using those little leftover pieces of prints you have been saving!


First, decide what type of bead you might like to make! They are all sorts of designs that already exist or you could even create your very own! These are some that I have used. The beads in this picture are an inch wide and five inches long. The smaller ones are pieces that were cut off the longer ones.


Then, cut out a ton of the paper beads in the shape you desire.


Next, gather your Glossy Mod Podge, an old paint brush or sponge, and a paperclip. Unfold the paperclip until it is in the shape of a long �L.�


Create a very small fold on one end of your short sides to help you start rolling the paper bead.


Apply a generous amount of Mod Podge to the back side of your paper for the bead. Begin rolling your paper bead around the paper clip.


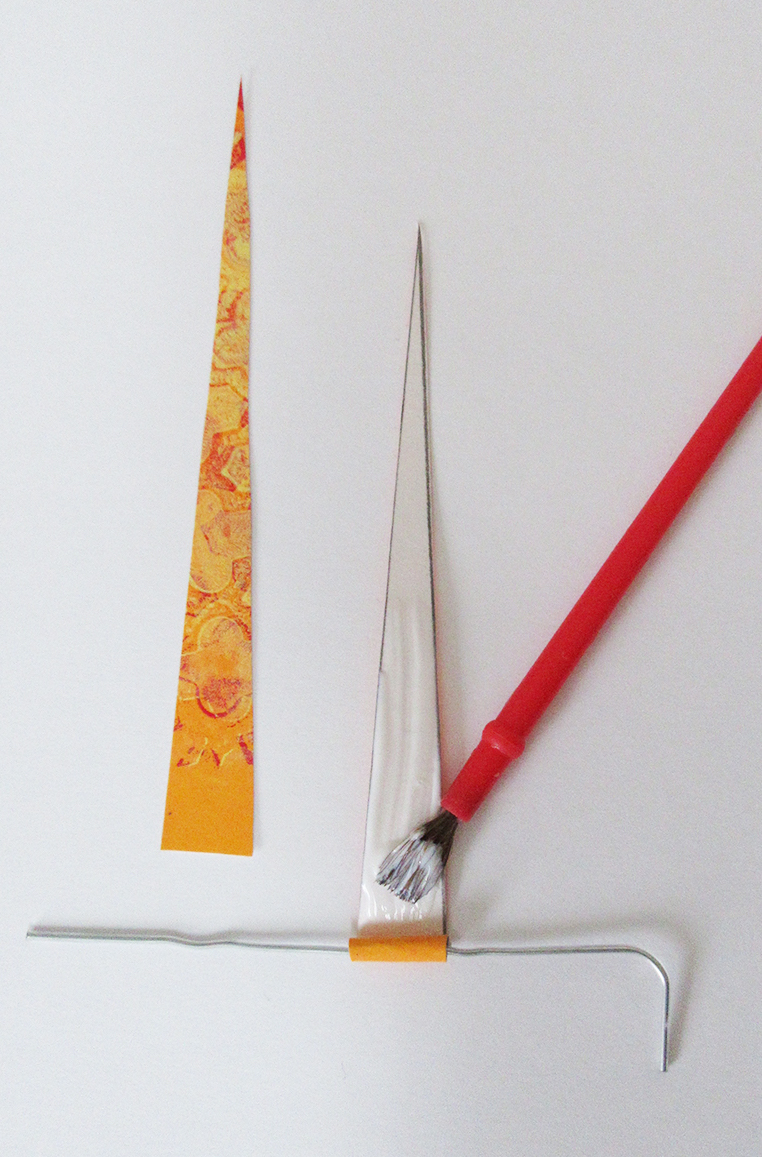
You may need to apply more Mod Podge before finishing rolling the bead since it dries rather quickly. Roll all the way until the tip of your paper is wrapped around the bead or if you prefer you can trim the tip of the paper off.


Paint the Glossy Mod Podge all around the outside of your bead to create the glossy finished look! Allow plenty of time to for your beads to dry. As an added bonus, the beads can stay wrapped around the paperclip while drying!


Tip: While you are waiting for them to dry, you can lay the paperclips across the lid of your Mod Podge or a little paper cup, so they aren�t touching the table!


Once your beads are all finished and dry you can then create beautiful wearable art with them! These are some pieces of jewelry I have made using my Gelli Arts paper beads. You can further embellish your finished beads with markers, acrylic paint, or Tulip Dimensional paint, like I did on the yellow necklace and earrings! I love how it adds my personal touch!

Necklaces:


Bracelet:


Earrings:


The list of possibilities is endless! If you give it a try, we�d love to see your results!

Here are the materials used to create the paper beads:

            • Finished Gelli Prints
            • Ruler
            • Pencil
            • Scissors
            • Glossy Mod Podge
            • Paint brush or Sponge brush
            • Paper clips
            • Markers for embellishment
Please�share your prints with us on our Facebook page, or on Instagram using the hashtag #gelliprint #gelliarts and #gelliplate. Tag us with @gelliarts on Instagram and Twitter too! We love to see what you're creating!!

Remember, we now have Gelli partners all over the world, so it's easier than ever to find a Gelli retailer near you!

Have Fun & Happy Printing!

Read More

Thursday, December 3, 2015

Gelli Printing: DIY Gift Wrap... and More!

We at Gelli Arts� often hear about the great time people are having when they break out the Gelli plates for a printing session with their kids and grandchildren. What a thrill for us knowing that a Gelli plate, some acrylic paint, a brayer, a few texture materials, and some paper can generate hours of enthusiastic family fun! We thank you for sharing your pictures and prints with us!


Printing your own unique wrapping paper is one of those projects that everyone (all ages!) can enjoy. It's that time of the year! If you're looking for a creative activity to share with your family�this is a good one! And the results add a personal and charming touch to your wrapped gifts.


You can find rolls of unprinted gift wrap paper and assorted plain shopping bags, as well as blank tags and cards, at craft stores�ready for printing. Or maybe you prefer to cut open some brown paper bags and print on the back side. This is a wonderful opportunity for repurposing paper bags!


Stamping with Gelli plates is especially well-suited for making decorated gift wrap. The new Mini plates are an endless source for creating all sorts of designs. On some of my papers, I started by stamping areas of color with a 6"x6" square, or 6" round and 4" round plates�then stamped over that layer with Mini shapes. Totally no-stress printing!


I used Blick Matte Acrylic paints�which work perfectly for this project. The colors are highly opaque and layer beautifully. The range of colors is wonderful, drying to a matte finish�and the printed matte paint surface accepts all sorts of pens and pencils for further embellishing. I used Sharpie Metallics and Uni-ball Signo pens on some of my papers and love how it looks!


Use any of your favorite monoprinting techniques�stencils, masks, combs, texture tools, etc.�to create images on your wrapping paper.


And how about adding words! If you've ever written or rubber-stamped a word directly on a Gelli plate�you know it prints in reverse. With printmaking in mind, Lesley Riley created a set of 'Reverse Alphabet Stamps'�and you can use them to stamp words directly on your Gelli plate. The stamp set features backwards letters for stamping directly into wet paint or stamp pad ink on a Gelli plate to pull a right-reading print. Gotta love that!


The click-together Pegz stamps make forming words so easy.


To start, snap the letters together to create your word stamp. Here's the process I used to print with my word stamp:

Tap StazOn solvent ink directly onto the Mini plate. Next, ink the word stamp with a different, contrasting StazOn color�and stamp an impression on the inked Mini plate. The Mini gel plate is ready now to stamp on a desired substrate�in this case, blank tags.

Try these convenient reverse stamps for personalizing gift wrap, tags, cards, journal pages�or any print!


Dress up your packages with Gelli-printed fabric strips instead of ribbon! Simply tear fabric strips to the width you want�and print on them with the same acrylic paints you use on your wrapping paper. Muslin and other tight weave cottons are good fabric choices for this. Such an easy way to make any package look extra special!


When it comes time to wrap your gifts with the fabulous papers you've created�why not add some Gelli-printed stickers, as shown in the previous blog post. It's a fast and easy way to put your hand-printed touch on any package, tag or card!


Artfully Gelli-printed gift wrap and tags show the love you put into wrapping your gifts!!


We love to see what you create, so please share your prints with us on our Facebook
page and Instagram! Be sure to use the hashtag(s) #gelliprint, #gelliplate or #gelliarts � we will be sure to find you! Tag us on Instagram and Twitter too with @gelliarts. We love to see what you are creating!

Remember, we now have Gelli partners all over the world, so it's easier than ever to find a Gelli retailer near you!


Read More