Change can be a good thing when it comes to the creative process. So instead of using a brayer to apply paint to the Gelli� plate, let's change it up and use a palette knife and various scrapers! Watch this video demonstrating monoprinting with this fun and expressive method for painting the plate.
Applying paint to your Gelli plate using alternative tools�such as a palette knife, old credit card or a smooth silicone scraper�gives you the opportunity to make unique marks.

Using a palette knife or other scraping tools for paint application opens up your printmaking experience to a different and expressive way of creating images. You can apply paint�and scrape some away. The edge of the tool is great for making thin lines and interesting marks.

When doing this process�keep in mind that any blobs of paint on the plate will squish out when printed and can form a thick splat on your print. If that's not your intention (and it may be!)�check the painted surface for blobs and deal with them before placing your printing paper on the plate to pull your print.

It�s fun to take your time developing an image on the gel plate�but you�ll want to use paint that has a longer open time. I love using Golden Open Acrylics for this process so I can work slowly and be more intentional in creating an image. Adding Golden Open Medium to any acrylic paint will extend its working time. And remember�prints with thick areas of Open paint take much longer to dry.

Along with using slow-drying paint comes another advantage. There�s usually enough wet paint left on the plate after the first pull to create a vibrant ghost print!

If working fast is more your style�using a palette knife to apply paint can be a fast and easy way to do it. Swiping paint onto the plate and quickly working in some spontaneous marks can result in free and wonderful prints!

In addition to palette knives, silicone tools�such as ColourShapers and Catalyst Blades�are wonderful tools for adding to and removing paint from the plate and making marks.

While applying paint on the plate with a palette knife�experiment with mixing your own colors! Blending colors or swiping two or more colors together can create lush and painterly results! Keep the color wheel in mind to avoid making mud when mixing colors on the plate. Analogous colors (next to each other on the color wheel) mix together harmoniously.

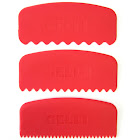
Combs offer another type of mark-making that compliments the process of adding and subtracting paint from the plate. The Gelli Arts�Printing Tools are especially wonderful because of their size and the nice bold marks you can make!

Double the fun by including more than one plate size in this process! Here I've stamped a 3"x5" plate onto an 8"x10" print�adding new layers. So easy! Place 3"x5" index cards on the wet painted plate before printing� for convenient masks. The masked areas are perfect spots for stamping with a 3"x5" plate!

The prints created in the video are printed on Strathmore Bristol Smooth Surface paper. The paper has a nice heavy weight and the smooth surface shows every detail beautifully.

You can see demonstrations in a few earlier blogs that show how using a paintbrush instead of a brayer is another great way to create prints without a brayer� (here�Painterly Layers), (here�The Painterly Monotype) and (here�Combed Prints & Watercolor). When brushstrokes are evident in prints, they show your hand in the process. Same goes for the swipes of a palette knife and other marks you leave on the plate. Distinctly yours.

As you can see�putting your brayer aside and experimenting with palette knives and scrapers can broaden your monoprinting experience and bring new excitement to the process! It's always exciting to try new techniques. Change is good!


THIS GIVEAWAY IS NOW CLOSED!!!!
AND OUR WINNER IS.... Kathryn C (email sent!) !!
We have a fabulous giveaway with great supplies for making prints without a brayer!

One lucky winner's prize kit will include:
� 4 - Golden Open Acrylics - 2 fl. oz. tubes
� 1 - Golden Matte Medium Open Acrylics - 4 fl. oz. bottle
� 1 - Plastic Palette Knife
To enter the giveaway, click on the red "ENTER GIVEAWAY HERE" button below! (This will ensure that we can contact the winner and that entries are limited to one per person. One winner will be selected from all the entries via a random number generator to receive this very special giveaway!) Entries will be accepted until Tuesday January 26th at noon EST. Our lucky winner will be contacted by email and announced here on the blog and on our Facebook page no later than Tuesday January 26th at 5pm EST!
THIS GIVEAWAY IS NOW CLOSED!!!!
Please�share your prints with us on our Facebook page, or on Instagram using the hashtag #gelliplate #gelliarts or #gelliprint. Tag us with @gelliarts on Instagram and Twitter too! We love to see what you're creating!!
Remember, we now have Gelli partners all over the world, so it's easier than ever to find a Gelli retailer near you!

Good Luck and Happy Printing!
Products Used in this Blog!
Products Used in this Blog!
|
|
|
|


|
|
|


|
|