Showing posts with label DIY. Show all posts

Thursday, July 7, 2016

Gelli Arts� Printed Popsicle Mobile

Hi there! Its Marsha back again with another fun summer craft idea for kids!

Wouldn't it be fun to have these popsicles as decorations for a tropical party? You can add them to a bunting, send them as invites or you can create a colorful mobile like I did.


Here's how I created them-

Step1:
Create a couple of fruity craft foam stamps.

Use adhesive backed craft foam or add double-sided adhesive to the back of plain craft foam. Adhere two pieces of foam on top of each other.


Draw shapes on the craft foam using an embossing tool or skewer. Then use scissors to cut the shapes out.


Adhere the shapes to a thicker craft foam and cut around the shapes.

Step 2:
Choose a couple of ice cream colored acrylic paints to work with and start painting!
Apply paint to the plate of your choice. I used the 5" x 7" Gelli� Plate. This meant that I could print twice on each sheet of my drawing paper, but you can of course cut the paper in half too.

Make marks with the DIY foam stamps and stamp the excess paint on the stamps off onto a spare sheet of paper or onto another print. 

Watch my video to get a better idea of how I did it!


Clean the foam stamps with a baby wipe or damp paper towel in between prints.


You'll need two prints of each design. The design doesn't have to be exactly the same, but you need a similar one for each side of the popsicle.

Step 3:
Cut each pair of prints out. Add more color and detail to the prints with colored pencils.

Step 4:

Apply a thin line of (temporary) glue on the edge of the back of one print and place the other one on top. Cut the prints into a popsicle shape.


Fold the prints open and adhere a nylon cord inside. Tape the thread down first, then fold the end up and secure that with a second piece of tape.
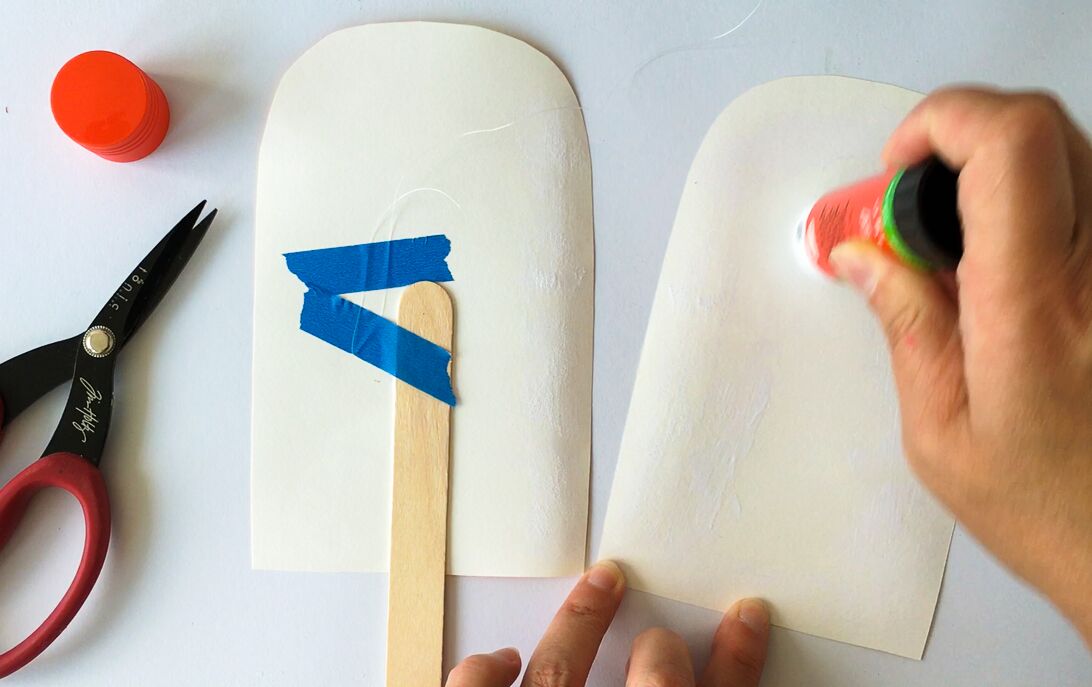


Adhere a craft stick onto the same popsicle side. Then apply glue to the other popsicle side and paste the two sides together.

Step 5:

Tie the popsicles to a metal hoop. Cover the metal hoop with washi tape.


Find the mobile a good place to hang, get a real popsicle and watch the paper popsicles dangle in the breeze!


Materials:


Other:
Paper (160 g/m2 drawing paper)
Acrylic paint 
(Deco Art Americana, Dragon Fruit, Tangelo Orange, 
Yellow Light, Sea Aqua, Indian Turquoise, Wisteria)
Craft foam
Double-sided adhesive
Embossing tool or skewer
Craft sticks
Scissors
Craft knife
Glue stick (Pritt)
(Washi) tape
Metal hoop (10�)
Nylon cord
Coloured pencils
Optional: a couple of beads

PS: Please�share your prints with us on our Facebook page, or on Instagram using the hashtag #gelliprint #gelliarts and #gelliplate. Tag us with @gelliarts on Instagram and Twitter too! We love to see what you're creating!!

Remember, we now have Gelli� partners all over the world, so it's easier than ever to find a Gelli� retailer near you!

Read More

Monday, June 1, 2015

DIY Gelli� Print Glass Paperweights!

The month of June ushers in more than just the promise of good weather. It's host to all sorts of gift-giving events! We have Father's Day, graduations, teacher appreciation gifts, weddings, bridal parties, and festive gatherings of all kinds.

Thinking about gifts for these occasions? Here's a simple, quick DIY gift that's perfect for ALL of them � beautiful glass paperweights!

The best part? You can use your Gelli� papers (and scraps!) to create individual, personalized glass paperweight gifts � handcrafted for each special person or event!


On the website www.photoweights.com, you'll find an inspiring selection of clear glass paperweight blanks that make ideal gifts � a great project for using your Gelli� printed papers. Based on my experiences with PhotoWeights� � the service is fast, friendly and helpful. The website also offers excellent ideas and instructions, so take a look.


The paperweight blanks from PhotoWeights come as a kit, ready to assemble. Along with the clear glass paperweight, each kit comes with a self-adhesive mounting board and a self-adhesive bottom pad. A printed card with full instructions is also included. You supply the art, and you're good to go!


To create your paperweight:
  1. Clean the glass paperweight. Be sure it's free of dust and fingerprints.
  2. Select your Gelli� print, or create a collage using Gelli� papers and scraps. Depending on the depth of the recessed area in your paperweight � you may also add dimensional objects.
  3. Remove the protective paper from the mounting board and place your print or collage face-up onto the self-adhesive side.
  4. Trim the print around the edge with scissors � to the size of the mounting board.
  5. Place the mounting board (image-side showing through the glass) into the recessed area on the bottom of the paperweight.
  6. Remove the protective paper from the bottom (velvet-like) pad and carefully center on the bottom of the paperweight. Gently press into place � then firmly press around the edges to create a good seal. That's it � you're done!

TIP:  Different style paperweights have recessed areas of varying depths (which are listed in the specs for each style) � so keep that in mind as you make your selection. If you want to create a collage with dimensional embellishments, or display an object � make sure you select a paperweight blank that's deep enough to accommodate your piece. Happily, all of the styles can be used with Gelli� prints!


Having a special party and planning to use place-cards? How about creating a paperweight for each table setting instead with the guest's name on it! Not only will it look fabulous on the table, but each one is a meaningful keepsake and a lasting memory of your event for your guests to take with them. Every Gelli� print is unique, and they'll add a truly creative touch to your table.


Maybe you simply want to say 'thank you' for a favor. Or commemorate a birthday or anniversary. Or surprise someone with a random act of kindness. A personal paperweight memento made from your prints is such a nice and thoughtful way to do that. It's such a beautiful way to share your art!


As great as these are as gifts, you hardly need an occasion to make a paperweight. You may want to have a few in your studio to help organize piles of collage papers. They're an inspiration to look at � they add an artful presence to any room.


And you can never have too many! Put a few together and you have an instant 'collection'. So if you have a spot in your studio or your home you'd like to personalize, this offers another way to display your art as beautiful objects!


For those of you with Etsy shops, or selling your printed works � paperweights showcasing your artwork offers another item you may want to sell!


And think beyond paper � here's a great opportunity to use your Gelli� prints on fabric!


Making paperweights is a project with a huge range of possibilities � from real simple to intricate � depending on how involved you want to get in each piece. If you've created ATC's, then you're already familiar with working in this approximate size range. Definitely fun!!


You'll love the way your Gelli� prints look under glass � all glossy and vibrant! What a fabulous and lasting way to show off your prints! These are keepers!!


Remember, we now have Gelli partners all over the world, so it's easier than ever to find a Gelli� retailer near you!


Have Fun and Happy Printing!

Materials Used in Today's Blog:

Gelli Arts�
Printing Plate


Photoweight�
Paperweight Kit 
Read More