Showing posts with label 5"x7" Gelli Plate. Show all posts

Thursday, July 7, 2016

Gelli Arts� Printed Popsicle Mobile

Hi there! Its Marsha back again with another fun summer craft idea for kids!

Wouldn't it be fun to have these popsicles as decorations for a tropical party? You can add them to a bunting, send them as invites or you can create a colorful mobile like I did.


Here's how I created them-

Step1:
Create a couple of fruity craft foam stamps.

Use adhesive backed craft foam or add double-sided adhesive to the back of plain craft foam. Adhere two pieces of foam on top of each other.


Draw shapes on the craft foam using an embossing tool or skewer. Then use scissors to cut the shapes out.


Adhere the shapes to a thicker craft foam and cut around the shapes.

Step 2:
Choose a couple of ice cream colored acrylic paints to work with and start painting!
Apply paint to the plate of your choice. I used the 5" x 7" Gelli� Plate. This meant that I could print twice on each sheet of my drawing paper, but you can of course cut the paper in half too.

Make marks with the DIY foam stamps and stamp the excess paint on the stamps off onto a spare sheet of paper or onto another print. 

Watch my video to get a better idea of how I did it!


Clean the foam stamps with a baby wipe or damp paper towel in between prints.


You'll need two prints of each design. The design doesn't have to be exactly the same, but you need a similar one for each side of the popsicle.

Step 3:
Cut each pair of prints out. Add more color and detail to the prints with colored pencils.

Step 4:

Apply a thin line of (temporary) glue on the edge of the back of one print and place the other one on top. Cut the prints into a popsicle shape.


Fold the prints open and adhere a nylon cord inside. Tape the thread down first, then fold the end up and secure that with a second piece of tape.
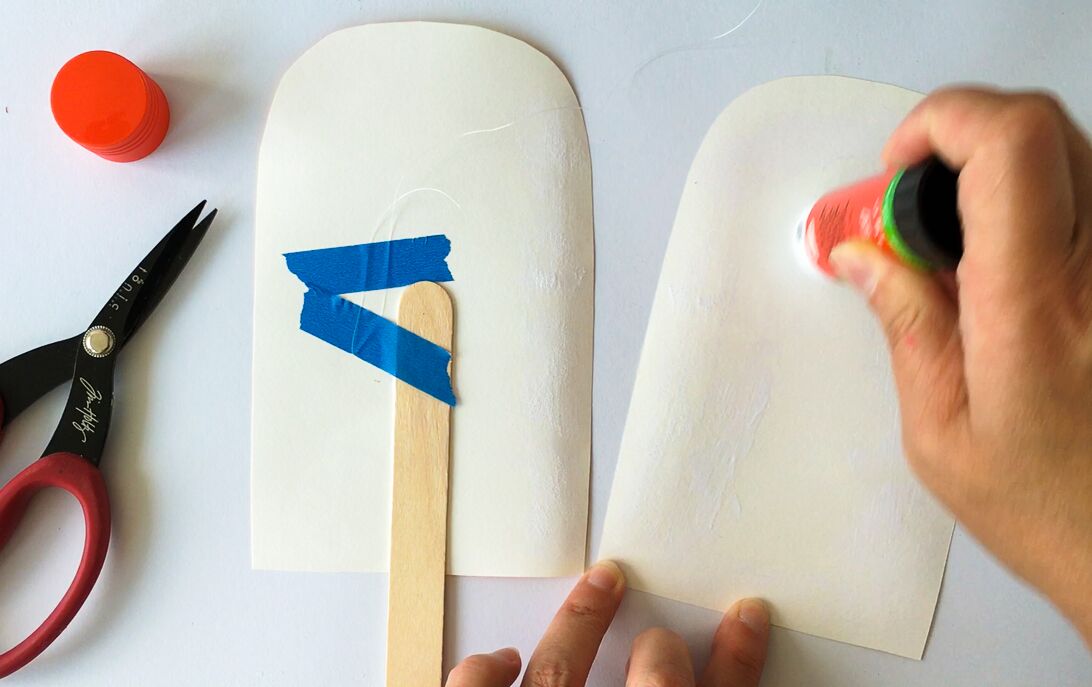


Adhere a craft stick onto the same popsicle side. Then apply glue to the other popsicle side and paste the two sides together.

Step 5:

Tie the popsicles to a metal hoop. Cover the metal hoop with washi tape.


Find the mobile a good place to hang, get a real popsicle and watch the paper popsicles dangle in the breeze!


Materials:


Other:
Paper (160 g/m2 drawing paper)
Acrylic paint 
(Deco Art Americana, Dragon Fruit, Tangelo Orange, 
Yellow Light, Sea Aqua, Indian Turquoise, Wisteria)
Craft foam
Double-sided adhesive
Embossing tool or skewer
Craft sticks
Scissors
Craft knife
Glue stick (Pritt)
(Washi) tape
Metal hoop (10�)
Nylon cord
Coloured pencils
Optional: a couple of beads

PS: Please�share your prints with us on our Facebook page, or on Instagram using the hashtag #gelliprint #gelliarts and #gelliplate. Tag us with @gelliarts on Instagram and Twitter too! We love to see what you're creating!!

Remember, we now have Gelli� partners all over the world, so it's easier than ever to find a Gelli� retailer near you!

Read More

Sunday, February 22, 2015

Printing with Gelli Arts� Printing Plates and DIY Foam Printing Plate Stamps!

Easy-to-make foam printing plate stamps create fabulous textured Gelli prints! Watch this video to see how to create DIY foam stamps for unique prints on cards!

FYI - Joan did this project a few years ago and it was such a big hit - we decided to create a DIY Card Printing Kit and a DIY Stamping & Printing Kit for you!  You can follow along her blog using the items in your new kit.  Feel free to use additional items to create textures or additional colors of acrylic paints!  You can make similar stamps with the foam sheets included in your kits.  

Now on to Joan's original blog!  Have fun!


They're so easy and fun to make, you'll have a collection of these stamps in no time! 


Express your creativity by making the stamps for printing your cards! 


There's a variety of materials that you can use to make a texture stamp. Here we're using thin sheets of foam�available at art stores for use as printmaking plates. It cuts easily with scissors or a craft knife�and drawing into it with a pen, pencil, stylus or other pointed tool gives you endless design opportunities! 


Decorative-edge scissors cut smoothly through the thin foam material�and hand punches work well too! If you have a die-cutting machine (like a Cuttlebug, etc.)�you can run it through with an embossing folder and create a very cool embossed surface on the foam. Then cut your own shapes from the embossed printing foam! 


Instead of the foam sheets for printmaking, you can also use styrofoam plates or repurposed clean food trays. 

Incise lines into the pieces with a pencil, ballpoint pen or stylus. Cut or punch out some small areas. The design can be simple shapes, or as intricate as you want. You can plan your design beforehand, or just wing it! 


As you make your marks in the foam, keep in mind that what you see is what you get. So that means you can write words in the foam too! No need to figure out reversals�how perfect for adding a sentiment to your cards! 


The prints in the video are made on the 5"x7" Gelli plate  �using Amsterdam Standard Series Acrylic paints and Pebeo Studio Acrylics. 

(You can use the 5" x 5" Gelli� plate and our new Gelli Arts� premium acrylic paints in your kit).


Strathmore has a new line of printmaking paper and they've made it into beautiful card and envelope sets. The cards and envelopes shown here are all printed on Strathmore Printmaking Cards.


The following steps describe the process shown in the video for creating the Gelli printed card: 
  1. Roll a thin layer of acrylic paint onto the Gelli plate with a brayer 
  2. Press a texture tool (like bubble wrap) into the paint 
  3. Cover with your card and pull a print 
  4. Wipe the plate clean (not essential�but makes a nice clean print) 
  5. Roll a layer of a contrasting color onto the plate with a brayer 
  6. Place your foam stamps on the painted plate 
  7. Cover with thin paper (such as deli paper)�to press the stamps into the paint and remove the paint from the plate around the stamps 
  8. Remove the cover paper and remove the foam stamps 
  9. Place your printed card on the Gelli plate to print a second layer 
  10. Rub to transfer the paint and pull your print�the second layer on your card!
TIP: Your printed image will 'pop' more if the paint colors for each layer are of different value (light/dark). You'll get very different results with transparent paints vs. opaque ones. Metallic paints also offer an exciting option as one of the layers. 


While you're printing your cards, also print on the envelopes! 

There are various ways to create a blank space for the address. Here are a few suggestions: 
  • Strategically place a piece of torn or cut paper on the painted, stamped Gelli plate to create a blank space. 
  • Place a removable label on the envelope as a mask. Print over it�then remove the label. 
  • Scrape or wipe off an area of wet paint on the Gelli plate, then print your envelope. 


Receiving hand-printed cards and envelopes is always special! Printing your unique stamp images on beautiful paper enhances your artwork and shows the love! 

THIS GIVEAWAY IS NOW CLOSED!!!!

Winner is Roberta K!


And to show OUR love�we have an exceptional GIVEAWAY for cardmaking!!! 


The prize kit includes: 

1 - 5"x7" Gelli Arts Gel Printing Plate 
1 - Strathmore Printmaking Cards - Package of 50 Cards and Envelopes 
8 - Amsterdam Standard Series Acrylic Paint - 120 ml tubes (4.1 fl. oz.) 
1 - Speedball 4" Pop-In Soft Rubber Brayer
1 - Inovart 'Presto' Foam Printing Plates - Package of 20 - 9"x12" sheets 

To enter the giveaway, click on the red "ENTER GIVEAWAY HERE" button below! (This will ensure that we can contact the winner and that entries are limited to one per person. One winner will be selected from all the entries via a random number generator to receive this very special giveaway!) 

Entries will be accepted until Wednesday, February 25th at 1pm. Our lucky winner will be contacted by email and announced here on the blog and on our Facebook page no later than Wednesday, the 25th at 5pm! 


THIS GIVEAWAY IS NOW CLOSED!!!!


Special thanks to our friends at Strathmore for their generous donation to our giveaway prize! 

Remember, we now have Gelli partners all over the world, so it's easier than ever to find a Gelli retailer near you! 


Good Luck and Happy Printing! 
Read More

Thursday, December 11, 2014

Gelli� Printing On-the-Go!

For those of you taking art supplies with you on-the-go, the small Gelli plates are essentials to pack in your art bag! Monoprinting beyond the studio has never been easier! Watch this video to see some fun portable printing supplies in action!


The list of 'must-have' supplies to pack in your travel bag are pretty individual. I'll show you what I pack in my travel art bag. Okay, maybe 'cram' is a more accurate word! But as you'll see, this bag provides for more than just monoprinting. Supplies for art journaling, collage, card making, stamping, doodling, and watercoloring are all included�for fun ways to work with Gelli prints!


The bag is the Voyager 15" Canvas Rigger Bag from Harbor Freight. This sturdy bag has a spacious interior and convenient pockets on the outside, so it holds a load of stuff! The strong handles make it manageable to carry�even when you load it up!


The bag is a blank canvas just waiting for your creative decorative inspiration! So have at it and make it your own!!


Here's how to decorate a bag like this one:

1.     Cut pieces of black felt to cover each of the outside pockets (only for the shorter pockets�there are two levels of pockets).
2.     Cut a piece of Gelli-printed fabric slightly smaller than each piece of black felt.
3.     Fuse each printed fabric piece to a piece of felt with fusible webbing, like Wonder-Under.
4.     If desired, work further on the printed fabric with colored pencils, fabric pens and paint markers.
5.     Apply red-liner sticky tape to the back of each felt piece. Remove the red liner and press each felt/fabric piece firmly into place on the canvas bag. If you prefer, the pieces can be glued in place with an adhesive, like tacky glue.
6.   If desired, you can paint the blank canvas bag before adhering the felt/fabric pieces.


Here's what's packed in the bag!!!

Gelli� Plates� The 3"x5" and 5"x7" fit easily into a travel art bag!


Acrylic paint � DecoArt Media Acrylics are convenient to pack � a little paint goes a long way!


Paper � Strathmore has fabulous papers just right for a variety of On-The-Go printing!


Brayer � it's a 4" Speedball Soft Rubber Pop-In Brayer for my travel art bag!


For mounting the Gelli plates to use as stamps�an Inkadinkadoo Clear Extra Large Block works well for the 3"x5" plate. And the 5"x7" Gelli plate fits nicely on a 5"x7" acrylic box frame!


The Crafter's Workshop small masks!!! TCW's Balzer Bits and Ronda's Fragments� designed by our Gelli friends, Julie Fei-Fan Balzer and Ronda Palazzari � are so perfect for printing with our small Gelli plates! And so easy to pack!


Derwent Inktense Pencils and Caran d'Ache NeoColor II crayons are both water-soluble. Great for adding more color and detail to your dry prints! And don't forget a pencil sharpener!


A Niji Waterbrush is an essential in any travel art bag! And Niji Pearlescent Watercolors add a sparkling touch to any print! Use the Waterbrush to blend colors and create washes with the Inktense Pencils and NeoColorII Crayons, too! A Ranger Mini Mister can come in handy when you want a spritz of water!


A set of fine point Micron Pens is another essential. Sharpie Water-based Metallic Extra Fine pens are a personal favorite for adding selective metallic details to almost any print!


For more doodling options, include Montana Acrylic Paint Markers! They're totally compatible with acrylic paint and great for working back into prints. Black and white are good for starters. And who doesn't love a Uni-Ball Signo White pen?!! A must-have, right?!! I think so!


Maybe alphabet stamps aren't on everyone's list, but they're such FUN! So toss in a set with a Ranger Archival Ink Black stamp pad and add some words to your prints, cards and journal pages!


The list goes on and on� a few more fun and handy things to pack in your art travel bag include plastic needlepoint canvas shapes and a piece of punchinella. They hardly take up any room! Rubbing plates are also great texture tools that are easy to pack!

Catalyst Contours are sized just right for travel�small and light. Roylco Paint Scrapers offer several more combing patterns and their flat shape makes them super handy to pack and easy to use!

For making collages with your printed papers, a few basics like a Cutter Bee Scissors with Safety Cover and UHU Glue Stick are great travel supplies! And throw in a few rolls of washi tape for the fun of it!

And let's not forget to include some Purell Hand Sanitizer and Wipes for cleaning things up!

There you have it! Enough cool supplies to keep you in Printmaking nirvana On-The-Go!!!

THIS GIVEAWAY IS NOW CLOSED!!!!

Ready for our HUGE Holiday Giveaway?!!!

We're stuffing ALL of these amazing supplies into a canvas bag for our most STUPENDOUS GIVEAWAY EVER!!! A Holiday Travel Art Bag Giveaway!!!


THIS GIVEAWAY IS NOW CLOSED!!!!

Enter our Spectacular Holiday Travel Art Bag Giveaway below. Check out all the options for entering the random drawing and choose one OR choose all the ways to enter!


Multiple entries allowed!a Rafflecopter giveaway  


A special thanks to our wonderful friends at DecoArt, Strathmore Paper and The Crafter's Workshop for their generous contributions to our Holiday Travel Art Bag Giveaway!!!

Happy Holidays from all of us at Gelli Arts!!!


Happy Printing and Good Luck!!!
Read More