
Hi there! Happy New Year!
I don�t know if it�s winter where you are, but there was snowfall in some parts of the Netherlands this week. Unfortunately, not in the city where I live, so I decided to create my own winter wonderland instead!
These simple paper snow globes are especially fun to create with kids. They can turn their own winter drawing into a mask and then puzzle to make gelli� prints!

Step 1:
Draw a circle on a sheet of drawing paper and then sketch a winter scene into the circle. Keep the sketch as simple as possible: just a few basic shapes, there is no need for detail!

Step 2:
Cut the sketch into masks. I cut out the trees, the house, the mountains and the sky first - in the video you can see that I kept the ground part together until later when I was ready to print that part.

Step 3:
Choose opaque paint colors. Also try and keep to a limited palette of colors that mix well so you don�t have to clean the plate in between prints unless it�s absolutely necessary.

Step 4:
Take a sheet of black paper and start gelli� printing!

Use the masks like a puzzle: decide which part you want to print, add the paint color you want to print with onto the plate, make marks if you want, put the mask on the plate leaving out the part you want to print and then pull the print!

Start with the trees and the house, then move on to the mountains and the sky. Print the snowy ground last, because you may want to clean the plate before you print that part.


Be sure to line up the mask and the paper you�re printing on with either the gelli� plate or the grid on your cutting mat, so you know where to place the paper each time you print another section.
If your work surface doesn�t have a grid, then mark it off with some (washi) tape that you can remove easily when done.

Step 5:
Cut the print into a circle and fill in the details with paint markers and pencil.
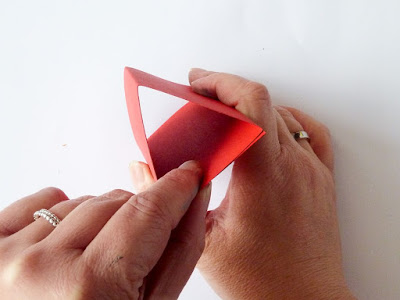
Step 6:
Assemble a snow globe. Take a 4� x 6� double notecard and cut a rounded edge on each side. I cut the first edge freehand and then I used the cut-off piece as a template.


Open up the card and fold the sides inwards towards the middle crease.


Add glue to one of the new flaps and fold the card into a little stand for the snow globe.

Back the print with card stock if needed and adhere it to the stand.

Give it a place where you can see it, grab a cup of hot cocoa and dream of a winter wonderland!

Give it a place where you can see it, grab a cup of hot cocoa and dream of a winter wonderland!


- Marsha

Materials
Gelli Arts�:
Other:
Drawing paper
Black paper
Red double note cards
Acrylic paint (Royal Talens Amsterdam: Burnt Umber,
Neutral Grey, Olive Green Light, Titanium White,
Turquoise Blue, Winsor & Newton Galeria: Sap Green)
Paint marker (Derwent Graphik Line Painter Fox,
UniPosca: white, yellow, orange)
Graphite pencil
Compasses
Embossing folder (Cuttlebug)
Glue stick
PS: Please�share your prints with us on our Facebook page, or on Instagram using the hashtag #gelliprint #gelliarts and #gelliplate. Tag us with @gelliarts on Instagram and Twitter too! We love to see what you're creating!!
Remember, we now have Gelli� partners all over the world, so it's easier than ever to find a Gelli� retailer near you!


EmoticonEmoticon